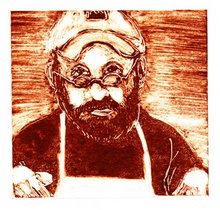
 Rome or Bust II - 8x10 Collograph Print with Watercolor
Another Museum Series print, this time it's a collograph. A detailed explanation of the collograph process is listed in the blog post prior (below) this one. The finished print was watercolored after printing. Below is a process pic of the very early design and layout of the collograph plate.
These two process pictures show close-ups of the construction paper layers laid out prior to being glued down. The edges of each layer hold ink when the plate is inked and wiped.

Below is the plate shiny and sticky with wet ink ready to print.
Below is the print being pulled from the plate after going through the press.
Have any questions about this process? Feel free to ask.
Tuesday, May 8, 2007
Rome or Bust II : Collograph
Subscribe to:
Post Comments (Atom)


4 comments:
Thank you Victor for these How To features. I've played a little with Monotype in the past, but Collograph printing is on my to do list for sometime soon, so discovering your blog is very timely. I'll experiment to find a weight of paper suitable for Collograph, but just wondering what weight your construction paper is?
That's a really nice print. Interesting process, too. I like how you give the detailed descriptions.
Your prints and explanations are MUCH better than mine! So now I'll tell my readers to come here. Thankyou.
Bee,
In reference to your question I wish I could tell you it was some very fancy paper, but its just construction paper, plain 'ol construction paper, the cheaper the better. If you buy fancy craft paper or even fancier looking construction paper it tends to be thinner, slicker (less texture) and stiffer. Sometimes I'll use cardstock or a fancy textured paper to do little details, but really anything will work and its all going to give you different results. Experiment!
Post a Comment